Back to Learn

How to Set Up a Spreadsheet for Batch Uploading

The quickest way to upload a large list to your app in Grandstand is to use the Batch Upload tool. Whether you upload it yourself, or you are preparing your spreadsheet for Grandstand’s experts to do it for you, the following tips and tricks will help it go smoothly.

Start with a spreadsheet, it doesn’t matter if it is Google Sheets, Apple’s Numbers or Excel. Eventually you will have to save the file as an .xls or .xlsx file, but you can start in any program. During the setup, ensure your columns match those that are included below. Only those columns that are marked as “Required” must have content loaded, but the more content you have the more useful for your guests and app users. To create your batch upload list, use the following as the columns in your file. Each list item should be its own row. And we cap lists to 1,000 items.

List Batch Upload Columns:
  • Title or Name (Required): This is the main name you want for your list entry. If this is a food vendor you would put their vendor name. If this is a speaker, you would put their name.
  • List Group (Required): This name must exactly match the name of the list group you would like it to go into. Limited to one list group per line.
  • Description (Required): Details about the list entry. For a food vendor this might be their full menu, or a description of the artist
  • Default Photo URL: You must include http:// or https:// and be aware that list logos or photos will get cropped square. If an interior page photo URL is not set then the default photo can be used on the detail page if desired. Please note that Dropbox and Google Drive links will be ignored as they do not link directly to a photo.
  • Web Link 1 & Web Link 2: You must include http:// or https://. If you are wanting to link to an email you must start it with mailto: followed by the email address.
  • Web Link 2: Same as Web Link 1
  • Web Link Button Title: Not required. If you don't include a title it will show 'View Website'
  • Web Link 2 Button Title: Not required. If you don't include a title it will show 'View Website'
  • Phone Number: Should ideally be in the format XXX-XXX-XXXX
  • Reward/Coupon: Match the name/title of the corresponding reward or coupon exactly
  • Location: Match the name/title of the map location exactly
  • Subcategory: You can organize lists to be under a heading, especially useful for sponsor lists.
  • Tags: Enter multiple tags separated by commas.
  • Twitter: Enter just the username tag for Twitter (example: grandstandapps instead of https://twitter.com/grandstandapps)
  • Facebook: Enter the full url including https:// for each of these.
  • Instagram: Enter the full url including https:// for each of these.
  • YouTube: Enter the full url including https:// for each of these.

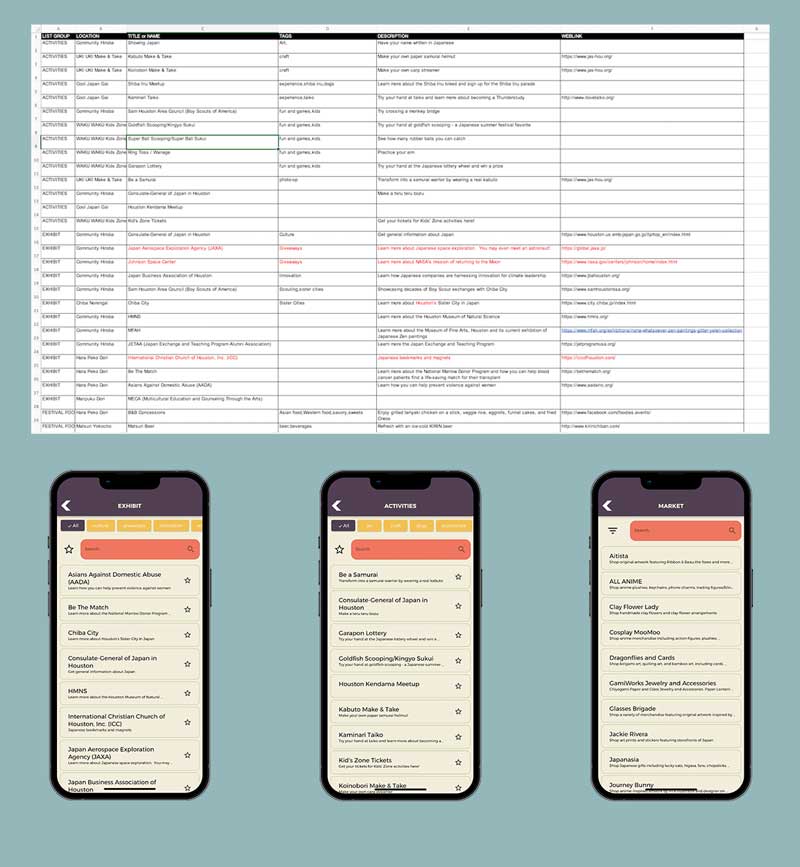
Included below is a an example of a spreadsheet for lists for an event. You can see that the List Groups shows that this is a list showing info for Activities, Exhibit, and Festival Food. In the first column is the list it should be part of, next is the location name, next is the title or name of the list item, the tags so people can filter the list, the description and the weblink.

Lists

Tutorials & Tips for
Lists

Other Tutorials & Tips